If you compare the mesh of the adult body to the teen one, you will notice that the teen torso is thicker and the breasts are smaller. This means that we have to resize it manually so that it will look as similar as possible to other teen clothes, while also taking into account the design of the clothing in question i.e. whether it should cling to the body or drape more loosely.
While doing this, we should account for other meshes that EA has made; if you look at them in-game, some may appear "floaty" in the front and back - this used to annoy me at first too, until I realized that EA does this in order to account for bottoms that may be poofy e.g. wide skirts. Which means that we should also leave a bit of space between the top and the body, even if it doesn't look that great - it'll look more natural in-game. Remember: we're using the nude mesh as a reference, so we should avoid making clothes look like they were glued on.
Of course, with some tops EA absolutely went overboard with the space, but that's another matter 🙃
The vertices we absolutely must make sure align properly are the ones where the top connects to other body parts, in this case the head and the legs. Not doing this results in gaps, which you may have seen if you tried enabling adult clothing for teens without remeshing them.
I recommend reshaping the mesh and then aligning the vertices, otherwise you may have to redo the alignment if you move the vertices around.

In the image above, I imported the legs as well (since this is a longer top), selected both the 'top' group and the 'legs' group, and enabled Wireframe view, to better see how I need to shape the mesh. Since teens have a bulkier body, we will need to reshape EA's original hourglass design to a more square form.
Now that we've seen what we need to do, hide the top and legs groups (select them and click on Hide), and go to Model tab and click the Select button. Make sure that under 'Select Options', Vertex and Ignore Backfaces are enabled.
Holding Alt, left click and drag, selecting the vertices you need. If you need to select more, use Alt + Shift + Left click (click or drag). If you need to deselect vertices, use Alt + Shift + Right click (click or drag). Move your viewpoint around to make sure you got all the vertices you wanted, and not ones that you don't want.
If you are unsure which part of the mesh you're working on, you can switch to Textured view, select the group_base group, then go to the Materials tab and click New (at which point a new material, called 'Material01' will be created). Next, click on the first button with the caption <none>, select your multiplier DDS image, and click the Assign button.
To remove the material, click the Delete button.

It's not very visible in the screenshot, but I selected the vertices around the breasts, only in the front and only what I need to reshape the breasts. Now, rotate the mesh so that the front faces your left (so you're viewing it from the side); you can hide and unhide the 'top' group to get an idea for how the mesh is supposed to be shaped.
Go to the Model tab again and click the Scale button, making sure the 'Center of Mass' option is enabled under Scale Options.
The X Y Z buttons show which axis the mesh will be resized on - width, height, depth; click on them to enable or disable them. Values below 1.0 shrink the mesh, while values above 1.0 enlarge it.
In moving vertices (Move button), things are a bit different. If viewing the model from the front:
-
X axis: negative values will move the selection to the left, positive values will move it to the right;
-
Y axis: negative values will lower the selection, positive values will raise it;
-
Z axis: negative values will move the selection to the back, positive values will move it to the front.
Of course, the values you need to use vary from mesh to mesh.
First I'm going to resize the chest only on the Z axis, to make it appear flatter. I will scale the mesh by about 0.8.
After scaling, I am going to click on the Move button, and move the selection by -0.008 on the Z axis.
I've discovered that the Z axis is preferable to the Y one when scaling the chest, as scaling by height (Y) tends to accentuate the curvature of the chest and make the breasts appear overly pointy. By using the Z axis, the curvature of the chest is reduced, while the breasts are pushed back, giving them a more natural appearance.

Don't worry about that misshapen row, we'll get to it later.
Now I'm going to rotate the viewpoint so that the front of the mesh is facing me, to work on the X axis (width of the chest).
Since the chest is so round, I will go ahead and select another row of vertices at the bottom - again, only in the front.
First I will scale the selection on the X axis, by 0.93.
Then, I will deselect the bottom row of vertices (which I just selected), the top row, and the vertices on the sides that are just skin.
I will scale the selection on the X axis once more, this time by 0.97.

Resizing the bottom part of the halter top is done in a similar fashion: select the rows of vertices that need to be resized (this time both on the front and back), and resize them gradually, so the halter top maintains a smooth appearance. EA's meshing is not that good in that respect, since this top is overly floaty near the bottom part.
In the images below, I first scaled the selection by 0.97 on the X axis, then deselected one row of vertices at a time and continuing to resize by 0.97. Considering the length of the halter top, I ended up hiding the 'top' group and using the 'legs' group as reference for the width.

And finally, we need to adjust the top on the Z axis. Rotate the mesh around in your viewpoint to check which areas need fixing (once again, I unhid the 'top' and 'legs' groups and selected them, for better contrast):

The area below the collarbone needs to be pushed back slightly, and the front and back of the torso need to be adjusted to match the teen body better. To make these adjustments, I normally use the Move tool and work in small increments e.g. 0.00#. At the end, I opted to move the lower part of the halter top a bit to the front, to leave some space between the clothing and the nude body (for poofy skirts, pants with belts etc.).
After making these adjustments, the halter top may look fine at a glance, but unhiding the teen 'top' group reveals some issues:

Since I only edited the front, which is the clothing part, the back i.e. the exposed skin, has remained with an odd shape.
In cases like this, where the vertices are in wrong but symmetrical positions, I recommend selecting all symmetrical vertices of the same type, and using the Scale tool instead of the Move tool. That way you can be sure the mesh remains proportional.
Again, the vertices don't need to be in the exact same positions as the ones on the teen body - just reasonably close.
At this stage it can also be more helpful to switch to Smooth Shaded view (without Colored Groups enabled) to see the lines better.
Vertices that are particularly annoying and tricky to get right are typically located in these areas:

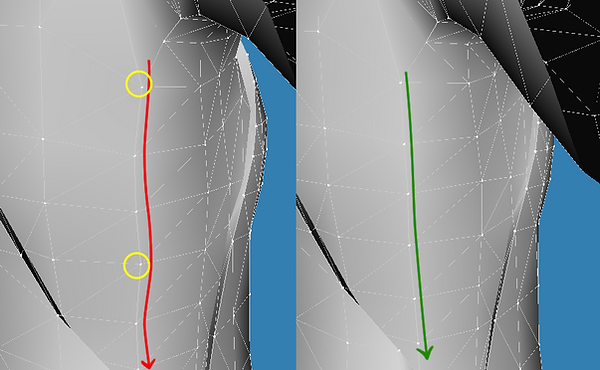
Another way to check if vertices are positioned correctly is to observe the lines connecting the vertices. If there are spots where they seem like they go in directions different than they should (see below), and the mesh looks fine if you rotate it around, those vertices may need to be moved back by -0.001 or -0.002 units on the Z axis.
Now that we're done reshaping the mesh, it's time to adjust the vertices at the neck and midriff 🙂